Deployment Guide
This guide covers how to build, test, and deploy Business Central extensions from this repository. It applies to all extensions -- whether developed in-house or by a vendor.
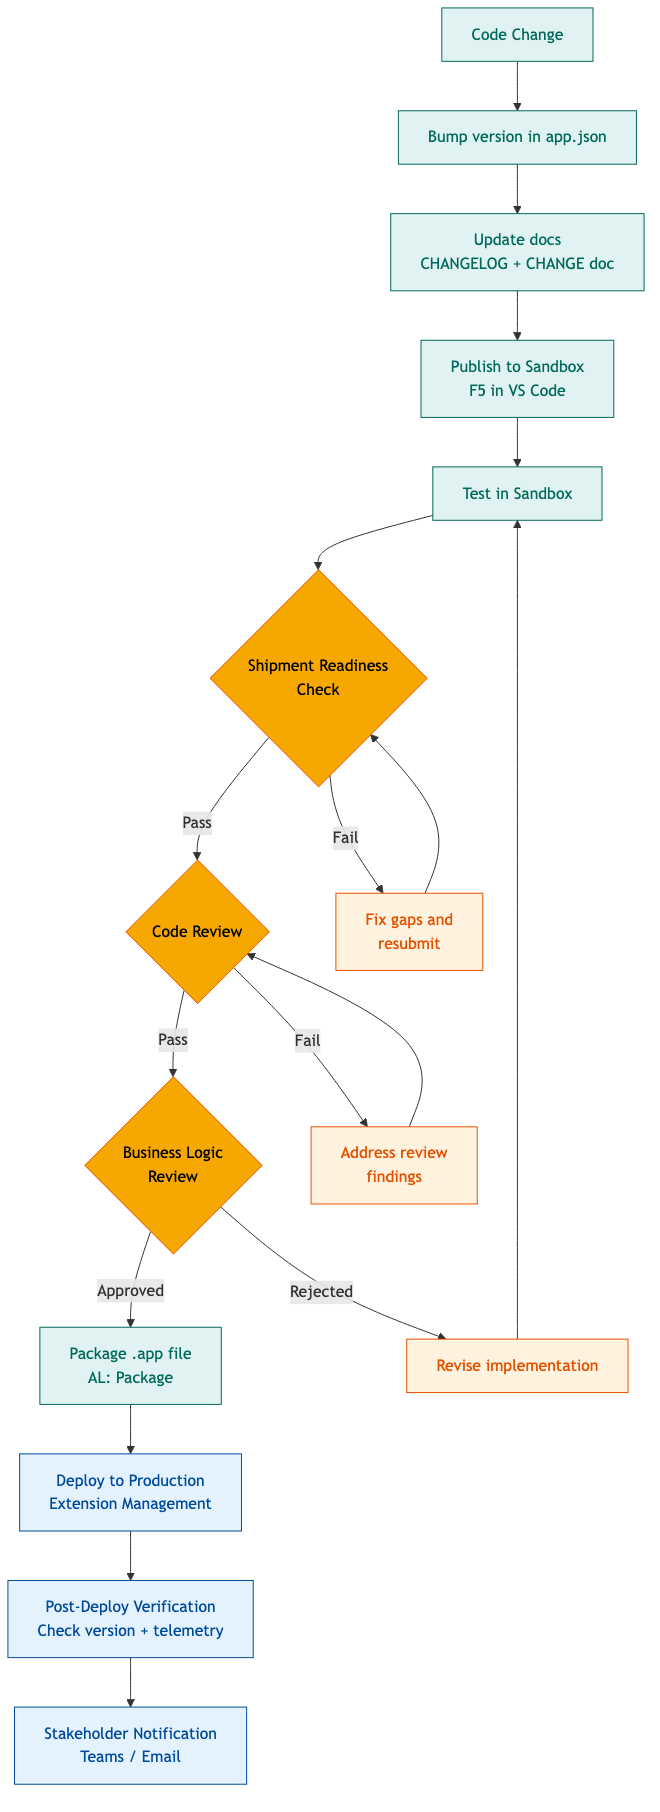
Deploying to Sandbox
Sandbox deployment is the standard development workflow. Every change should be tested in the sandbox before it touches Production.
Prerequisites
- VS Code with the AL Language extension
- Access to the Bestway BC sandbox environment (currently
Sandbox_Test_11062025) - OAuth2 credentials configured in the project root
.envfile
Steps
-
Open the extension folder in VS Code. Each extension is a standalone project -- open the top-level folder (e.g.,
Service Order Lockout/) directly, not the repository root. -
Create a
launch.jsonin the.vscode/directory if one doesn't exist. This file configures the sandbox connection (tenant, environment, authentication). It's gitignored -- you'll need to create it locally. Example structure:{
"version": "0.2.0",
"configurations": [
{
"type": "al",
"request": "launch",
"name": "Sandbox",
"environmentType": "Sandbox",
"environmentName": "Sandbox_Test_11062025",
"tenant": "823af2fd-2570-49e5-b22c-1614ac645202",
"startupObjectId": 22,
"startupObjectType": "Page"
}
]
} -
Download symbols. Open the Command Palette (
Cmd+Shift+P) and run AL: Download Symbols. This pulls the base application and all dependency symbols into.alpackages/. You'll need to authenticate with your BC credentials. -
Publish. Press F5 or run AL: Publish from the Command Palette. This compiles the extension and deploys it to the sandbox in one step. If compilation fails, fix the errors and try again -- the Output panel (
Ctrl+Shift+U) will show the specific issues. -
Verify. Open the sandbox in a browser and test the extension's functionality. For extensions with automated tests, run them via the BC Test Tool (page 130401).
Command-Line Compilation
You can also compile without deploying using the AL compiler directly:
cd "<extension-folder>"
"<path-to-alc>" \
  /project:"." \
  /packagecachepath:".alpackages" \
  /out:"./output/<extension-name>.app"
To find the alc compiler on your machine, look in your VS Code extensions directory:
| OS | Typical path |
|---|---|
| macOS | ~/.vscode/extensions/ms-dynamics-smb.al-<version>/bin/darwin/alc |
| Windows | %USERPROFILE%\.vscode\extensions\ms-dynamics-smb.al-<version>\bin\win32\alc.exe |
| Linux | ~/.vscode/extensions/ms-dynamics-smb.al-<version>/bin/linux/alc |
Replace <version> with your installed AL Language extension version (e.g., 16.3.2065053). You can find this in VS Code under Extensions > AL Language > version number.
This is useful for CI checks and for verifying compilation without a sandbox connection.
Deploying to Production
Production deployments require a packaged .app file and access to the BC Admin Center or Extension Management page.
Steps
-
Bump the version in
app.json(see Version Bumping below). -
Update documentation -- CHANGELOG.md entry, CHANGE document, and any affected README sections (see Change Documentation below).
-
Package the extension. In VS Code, run AL: Package from the Command Palette. This produces a
.appfile in the extension's output directory. -
Deploy via Extension Management. In BC Production, navigate to the Extension Management page, select Upload Extension, and upload the
.appfile. Alternatively, deploy through the Business Central Admin Center for the Production environment. -
Verify post-deployment. Confirm the extension appears with the correct version number in Extension Management. Test critical functionality. Check Application Insights for telemetry events (startup, any errors).
Production Deployment Checklist
Before deploying to Production:
- All changes tested in Sandbox
- Version bumped in
app.json - CHANGELOG.md updated with a new version entry
- CHANGE-v{version}.md written with deployment notes
- Stakeholder notification drafted (see Deployment Communication below)
- Migration notes reviewed -- does this version require manual steps before or after deployment?
- Rollback plan identified -- can the previous version be reinstalled if something goes wrong?
Version Bumping
All extensions use four-part versioning: major.minor.patch.build.
| Segment | When to increment | Example |
|---|---|---|
| Major | Breaking changes, schema migrations that prevent in-place upgrade | 1.0.0.0 to 2.0.0.0 |
| Minor | New features, significant enhancements | 1.1.0.0 to 1.2.0.0 |
| Patch | Bug fixes, performance improvements, non-breaking changes | 1.1.0.0 to 1.1.1.0 |
| Build | Iterative fixes during rapid development cycles | 1.1.0.0 to 1.1.0.1 |
The version in app.json is the single source of truth. All documentation (CHANGELOG headers, CHANGE document filenames, deployment notifications) must match exactly.
Where the Version Appears
app.json-- theversionfielddocs/CHANGELOG.md-- the version header for the latest entrydocs/CHANGE-v{version}.md-- the filename- UAT test plan -- the
versionfield in the plan dict (if the extension has one)
When bumping, update all four locations. A mismatch between any of these is a shipment readiness failure.
Change Documentation
Every extension maintains a two-tier documentation system. This is not optional -- if the app.json version is bumped, both tiers must have corresponding entries.
Tier 1: CHANGELOG.md (Summary)
Located at <extension>/docs/CHANGELOG.md. This is the index -- one entry per version with categorized bullet points and a link to the detailed change document.
Categories (use only these, and only include categories that have entries):
| Category | Use for |
|---|---|
| Added | New objects, fields, features, or capabilities |
| Changed | Modifications to existing behavior, UI, or logic |
| Fixed | Bug fixes |
| Removed | Removed objects, fields, or features |
| Deprecated | Features to be removed in a future version |
| Security | Security-related changes (credential handling, permission fixes) |
| Migration Notes | Steps required when upgrading |
Tier 2: CHANGE-v{version}.md (Detailed)
Located at <extension>/docs/CHANGE-v{version}.md. This is the deep dive -- a narrative document covering:
- Background -- context for the changes
- Summary of Changes -- table of all items with severity, category, and description
- Detailed Changes -- per-item sections with file references, before/after explanations, and rationale
- Object Inventory -- all objects in the extension with IDs, types, and status
- Deployment Notes -- pre/post-deployment steps, warnings, and verification procedures
- Known Limitations -- accepted edge cases with justification
For the full specification, see the Contribution Guidelines.
Deployment Communication
Every Production deployment needs a stakeholder notification. The notification should be sent before (or immediately after) deployment and should include:
- Extension name and version -- what's being deployed
- Summary of changes -- 3-5 bullet points covering the most impactful items
- Who's affected -- which teams or workflows are impacted
- Known limitations -- anything that doesn't work yet or has caveats
- Verification steps -- how stakeholders can confirm the deployment is working
- Contact -- who to reach out to if something looks wrong
The format depends on the audience. For Rob and Jen, a short Teams message with the bullet points is sufficient. For broader distribution (CS teams, warehouse), a more structured notification with step-by-step verification instructions is appropriate.
Example Notification
Deployed: Service Order Lockout v1.1.1.0 to Production
- CS supervisors (BW-CS-MANAGERS) can now release stuck locks directly -- no need to escalate to IT
- No manual permission assignment required -- the upgrade handles it automatically
- Error messages now name the specific permission set needed
Verify: Open a Service Order in the sandbox. The lock should engage automatically. Supervisors should see the "Release Lock" action on locked orders they don't own.
Let me know if anything looks off.